You’ve got a new flat top grill, you’ve done your research, and now it’s time to cook something. My first piece of advice? Don’t panic, and don’t make this harder than it needs to be.
Whether you have a Blackstone griddle, a Camp Chef, a Pit Boss, or another flat top, your first few cooks are about learning your equipment. Get comfortable with the controls, figure out where the hot spots are, and learn how different foods behave on that big piece of steel.
Chicken thighs make a great practice cook because they teach you a little bit of everything: managing heat, rendering fat, building color, handling sugary sauces, checking internal temperature, and cleaning up. Here’s how I approach the whole process, from firing up the griddle to sitting down for dinner.
Table of Contents
- What You'll Learn
- Start With Food You Already Know
- Why Chicken Thighs Are a Good Beginner Griddle Cook
- Fire Up Safely and Preheat on Low
- Put the Chicken Down and Learn Your Heat Zones
- Save Sugary Barbecue Sauce for the Finish
- Plan the Cooking Order Before Everything Hits the Griddle
- Check Internal Temperature in Every Piece
- Clean as You Go, Especially Around Sugar
- Use Residual Heat, Then Match Cleanup to the Mess
- Build the Seasoning Without Overthinking Every Mark
What You'll Learn
- Preheat on low, then manage changing heat zones with small burner adjustments and food placement.
- Add sugary barbecue sauce near the end so the glaze does not burn before the chicken finishes.
- Check every chicken thigh with a probe thermometer rather than judging doneness by surface color.
- Clean as you cook, then match the final cleanup to the amount of residue left behind.
Start With Food You Already Know
Your first griddle meal does not need to be a backyard hibachi production for the entire neighborhood. If you’re comfortable making eggs, bacon, and pancakes, start there. If burgers and hot dogs are your thing, cook those.
Learn a new cooking surface with familiar food. That way, you’re not trying to figure out a new recipe, unfamiliar tools, and four burner controls all at once.
Keep your accessories simple, too. For the techniques here, the useful tools are:
- A spatula and tongs: For turning and moving food.
- A griddle or bench scraper: For clearing food particles between batches and during cooking.
- An instant-read probe thermometer: For checking the temperature inside the food.
- A water bottle and paper towels: For cleanup when the surface needs more than a scrape.
- A little cooking oil: For foods that need it and a thin protective coat after cleaning.
- A melting dome: A helpful extra for trapping heat around food as it finishes.
An infrared thermometer can help you understand surface temperatures, but I don’t consider it the first thing a beginner needs. A probe thermometer that tells you whether your chicken is actually done is more important.
Why Chicken Thighs Are a Good Beginner Griddle Cook
Chicken thighs are forgiving. That doesn’t mean you can leave them on forever, but they give you more breathing room than a lean piece of chicken. They also take on dry rubs, marinades, and sauces really well.
For this cook, I use skin-on thighs in four different preparations:
- Teriyaki-style marinated thighs: A combination of soy sauce, garlic, ginger, sriracha, orange marmalade in place of orange juice, honey, and brown sugar.
- Plain thighs: Left without sauce at the beginning so they can be glazed with barbecue sauce near the end.
- Simply seasoned thighs: Coated with a favorite everyday seasoning.
- Barbecue-rubbed thighs: Coated with a barbecue seasoning containing added sugar.
This is a cooking lesson, not a measured marinade recipe. The point is to compare what happens when plain chicken, dry seasoning, sugary rub, and a sweet marinade all hit the flat top.
You’ll see very quickly that the outside of each piece develops differently, even though you’re cooking the same cut of meat.
Fire Up Safely and Preheat on Low
With a propane griddle, make the gas supply part of your routine. Follow your model’s lighting instructions, and shut the gas off at the tank when you’re finished, not just at the burner knobs. You don’t want the supply left open while you’re back inside the house.
My next rule is to preheat on low. Give the steel a chance to warm gradually, then adjust the burners for the food you’re cooking. That gradual warmup is especially important when you’re trying to avoid uneven heating and potential warping. Always follow the instructions for your particular griddle.
For these chicken thighs, I’m initially aiming for a surface temperature of about 350°F to 375°F. That’s a starting point, not a number you need to chase every second.
One more safety detail that’s easy to overlook: the sides and edges get extremely hot. Keep plastic squeeze bottles, food-storage containers, and paper towels away from those areas. The cooking surface isn’t the only part that can burn you or melt something.
Put the Chicken Down and Learn Your Heat Zones
I start the thighs skin-side down. For this cook, I don’t put down extra oil or butter first. The skin-on thighs render their own fat, which helps lubricate the seasoned griddle surface.
That does not mean every food can go down without oil. Potatoes and vegetables are different from fatty, skin-on chicken. Think about what the food is bringing to the surface before you automatically reach for the oil bottle.
Listen to what happens when food moves
A flat top is not one perfectly even temperature from corner to corner. You may find that the right side cooks hotter than the left, or that the front and back edges are cooler than the middle.
Food changes those temperatures, too. A wet marinade or a pile of saucy hibachi ingredients can pull a lot of heat out of the area directly underneath it.
If a piece of chicken is sitting quietly in a wet patch, move it to a nearby dry section. You may hear the sizzle pick right back up. That’s a useful clue: the previous spot had cooled, while the fresh section still had more heat available.
Don’t immediately crank the burners to high when the sizzle slows down. Make small adjustments, be patient, and use the space you have. Moving food can solve a problem without overheating the entire griddle.
Use color as feedback
As you turn the thighs, compare their surfaces. The plain chicken develops a lighter golden skin. The everyday seasoning builds a more noticeable crust. The sugary barbecue rub gets darker faster.
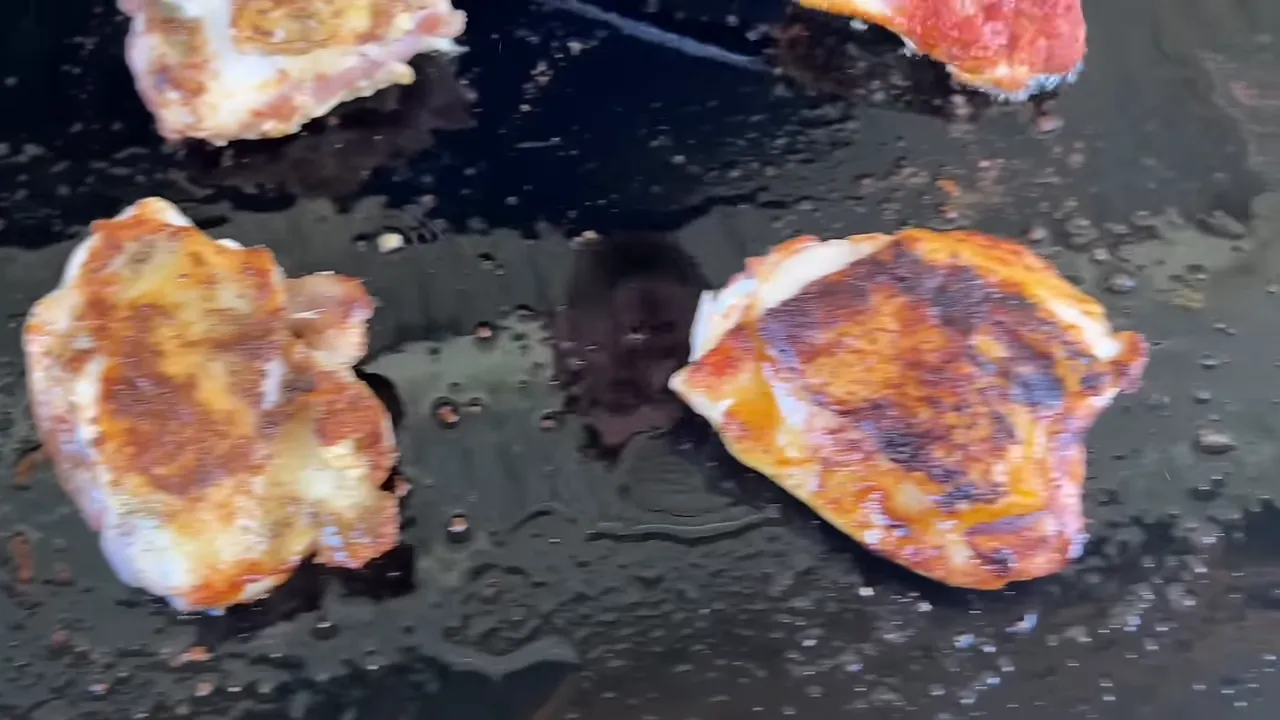
That comparison is the lesson. A darker outside does not necessarily mean the inside is further along. It may simply mean the seasoning contains sugar that is browning faster than the chicken cooks.
Even a favorite everyday seasoning can scorch if you leave it against the hot surface too long. Keep checking the underside, flip as needed, and move pieces when one area is cooking too aggressively.
Save Sugary Barbecue Sauce for the Finish
Sweet sauces are where a lot of beginner griddle cooks get into trouble. They taste great, but they don’t need the same amount of cooking time as a thick chicken thigh.
The teriyaki-style marinade starts leaving sticky, browned sugar on the steel early in the cook. A sugary barbecue rub develops dark patches quickly, too. Add a sweet barbecue sauce too soon, and you can end up with scorched sauce while the chicken still needs time.
I deliberately let one of the barbecue-coated pieces go too far to show the difference. Within just a few minutes of adding sauce, it leaves a dark, burned coating on the surface. That’s not the kind of crust we’re after, and now the chicken is sitting in that burned residue.
The better approach is simple:
- Cook the chicken most of the way without the barbecue sauce.
- Check its internal temperature so you know how close it is to being done.
- Add the sauce during the final stage of cooking.
- Turn the chicken briefly through the sauce to coat and set the glaze.
- Keep checking and moving it rather than leaving the sweet coating against the steel.
In this cook, I wait until the plain thighs are only a few degrees from their finished temperature before adding the barbecue sauce. The goal is a glazed finish, not a long cook in sugar.
A sugary barbecue rub deserves the same attention. On a larger piece of meat that needs more time, consider applying that kind of seasoning later rather than giving it the entire cook to darken.
Plan the Cooking Order Before Everything Hits the Griddle
There’s a natural order to a good griddle meal. The foods that need the most time should generally get started before the quick-cooking ingredients.
Breakfast is an easy example. If you put the eggs down first while the bacon still needs to cook, those eggs will be finished long before the rest of breakfast. Think through the bacon, pancakes, and eggs before you begin so everything reaches the plate as fresh as possible.
The same thinking applies to the chicken. The meat needs time to cook through. The sweet glaze only needs a short finish. Putting both on at the beginning ignores the fact that they cook at very different speeds.
Learn the pace of your flat top, not just the position of its knobs. That includes how quickly food browns, how long the center takes to finish, and when a sauce needs to join the cook.
Check Internal Temperature in Every Piece
Surface temperature helps you manage the cook. Internal temperature tells you whether the food is done. Those are two different jobs.
Use an instant-read probe thermometer to check the thickest part of the chicken, avoiding the bone. For food safety, the federal safe minimum internal temperature guidance calls for chicken thighs and other poultry to reach 165°F.
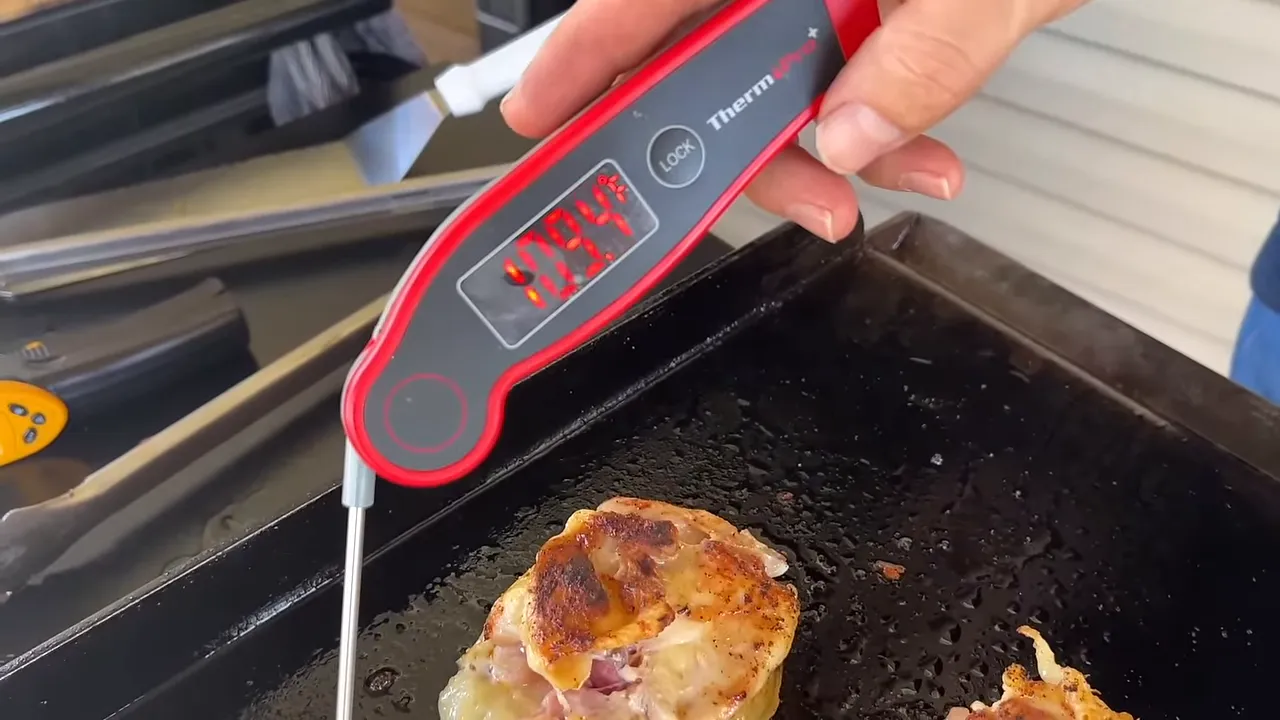
Don’t check one thigh and assume the whole batch matches. One piece may have spent most of its time over a hot spot, while another has been sitting near a cooler edge. Check each piece and remove it when it is ready.
A dome can help trap heat around the chicken as it finishes. It’s a useful tool, but it doesn’t replace the thermometer. Golden skin, dark seasoning, and a hot griddle are not proof that the center is done.
Clean as You Go, Especially Around Sugar
If there’s one habit I want a beginner to pick up early, it’s this: clean the griddle while you’re cooking.
As the sweet marinade cooks, you’ll notice little brown specks and sticky patches around the chicken. That’s sugar building up on the steel. Leave it there for the rest of the cook and it becomes a much bigger cleanup job.
Instead of pushing all that residue back into the chicken, work in sections:
- Move the food to another suitable area of the griddle.
- Scrape the exposed section while the residue is still warm.
- Push the loosened debris into the grease trough or collection area.
- Use the cleared space again as needed.
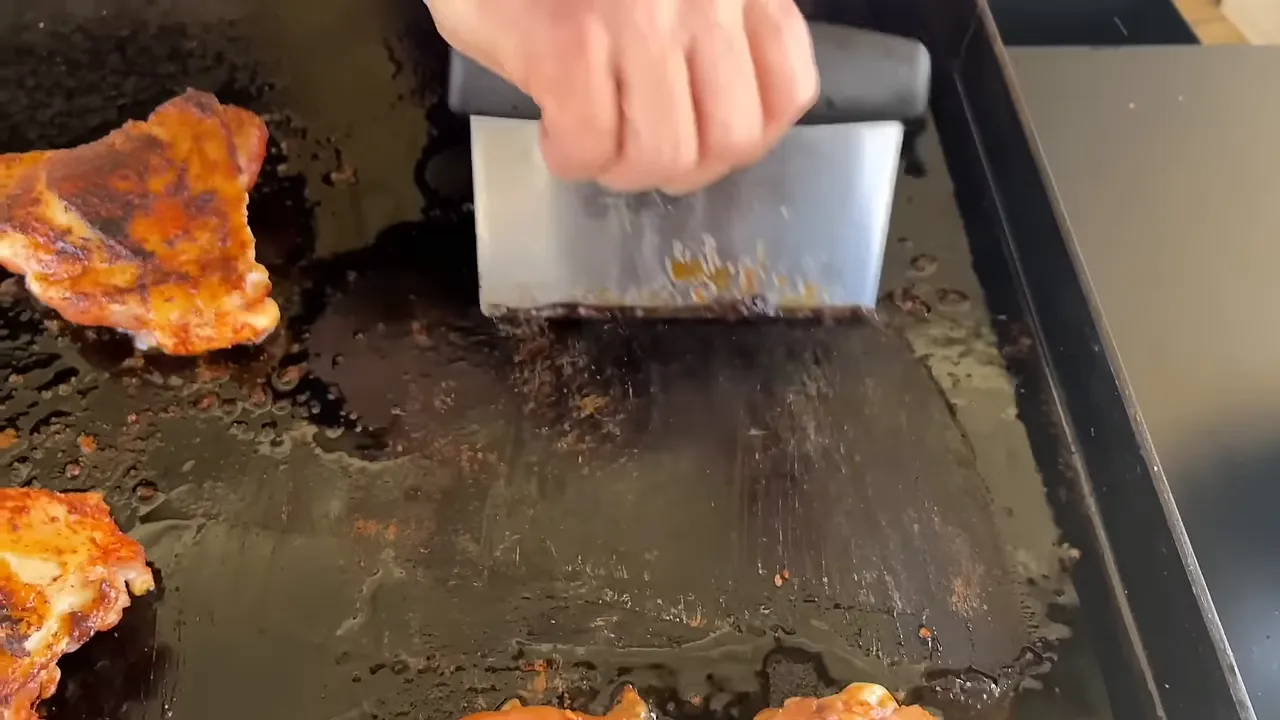
I use the same habit with burgers and hibachi. When food moves to a fresh spot, that’s an opportunity to clean the space it just left.
For stubborn sugary residue, a little water on the hot surface helps loosen the buildup so it can be scraped away. Be careful of the steam. Keep your hands clear, and don’t lean over the area as the water hits.
Doing small amounts of cleanup throughout the cook means you’re not facing the whole mess after dinner is ready.
Use Residual Heat, Then Match Cleanup to the Mess
Near the end of this cook, I shut off the burners and close the propane supply. The steel still holds plenty of heat, so the griddle doesn’t instantly stop cooking.
You can use that residual heat during the final stage, provided you keep checking the chicken and confirm that every piece reaches its safe finished temperature. Shutting down also lets the surface begin cooling before the last cleanup.
You don’t need to deep-clean a griddle after every single meal. I think about cleanup in three levels.
Light cleanup: Wipe the surface
If you warmed tortillas with a little butter for quesadillas and there’s no stuck-on food, a wipe may be all the surface needs. A small breakfast cook may also leave very little residue once the food and excess grease are removed.
There’s no reason to add water automatically if there’s nothing stuck that needs releasing.
Medium cleanup: Scrape off the food particles
Burgers, fish, or a few chicken breasts may leave browned bits behind. Give the surface a scrape to remove those particles.
Then consider the flavor left on the griddle. If you cooked something heavily spiced and tomorrow’s breakfast is French toast, a little water-assisted cleaning makes more sense than leaving that seasoning behind.
Heavy cleanup: Loosen, scrape, wipe, and re-oil
Sugary hibachi sauces, barbecue glazes, and longer cooks can leave a stubborn coating. That’s when I use water to loosen the residue, scrape away the food particles, and wipe the surface clean.
Once it’s clean and dry, apply a very thin layer of oil while the griddle is still warm. You want a light coat, not puddles or a thick, sticky film.
Take care around the corners and edges. Oil can splatter when it gets pushed into a hot corner, and the side of your hand can easily brush against the hot rim.
Build the Seasoning Without Overthinking Every Mark
A working griddle isn’t going to look identical after every cook. In this chicken cook, the areas exposed mostly to rendered chicken fat stay relatively slick, while the sugary sections need more attention.
Changes in color don’t automatically mean you’ve ruined the surface. A lighter or brown-looking patch after cleaning can be a change in the seasoning layer, not necessarily rust. Look at the condition of the surface rather than panicking over every mark.
Routine care is about removing food buildup and maintaining that thin layer of oil. A full reseasoning is a separate job when the surface actually needs it, not something you must do from scratch after every meal.
By cleaning as you go, you can usually handle the final wipe and light oiling while the chicken rests for about five to ten minutes. Then the food is ready, the griddle is clean, and you can sit down with your family instead of standing outside scraping burned barbecue sauce.
That’s the real goal of flat top grilling for beginners: stay calm, cook familiar food, learn your heat zones, and build good habits one meal at a time. You don’t have to master everything on the first cook. Just get comfortable with your griddle.


