Thanksgiving dinner gets a whole lot easier when you stop trying to cook Thanksgiving dinner all at once. The turkey gets plenty of attention, but the real work is everything around it: chopping vegetables, boiling macaroni, grating cheese, making bread, washing pots, and finding somewhere to put it all.
My approach is simple: do the prep early, then finish the dishes fresh. I would rather have one busy prep day than spend the holiday fighting a refrigerator-cold pan of mashed potatoes while every oven rack is occupied.
This is the plan we used for our family meal, including a couple of experiments with overnight dinner rolls and vacuum-sealed potatoes. Some things worked exactly as expected. Some needed a little patience. And yes, there is room for boxed cornbread, frozen pie crust, and a jar of gravy. Nobody needs extra shenanigans just to prove everything was homemade.
Key Takeaways
- Prep individual components ahead instead of reheating large, dense pans of finished Thanksgiving sides.
- Drain green beans thoroughly and keep cheese sauce loose enough to coat the macaroni.
- Use the turkey's resting time to bake casseroles and finish the remaining sides.
- Monitor turkey temperatures carefully and allow refrigerated rolls enough time to finish proofing.
Table of Contents
- Start With the Menu and a Realistic Prep Plan
- Day Before: Bake the Dressing Bread First
- Dry-Brine the Turkey Overnight
- Drain the Green Beans More Than You Think You Need To
- Get the Chocolate Bourbon Pecan Pie Done Early
- Cook the Macaroni and the Dressing Base Ahead
- Make the Dinner Roll Dough and Prep the Potatoes
- Thanksgiving Morning: Start With the Herb Butter Turkey
- While the Turkey Roasts: Potatoes, Dressing, and Roll Proofing
- Make the Queso Mac and Cheese Sauce
- Build the Country Ham and Gruyère Green Bean Casserole
- Use the Turkey's Rest to Finish the Sides
- Turn the Turkey Drippings Into Semi-Homemade Gravy
- Carve, Hold Safely, and Get Everybody Fed
- The Thermometer I Used for This Meal
Start With the Menu and a Realistic Prep Plan
Our main Thanksgiving menu included:
- Dry-brined turkey with herb butter
- Sausage and herb dressing made with biscuits and cornbread
- Green bean casserole with country ham and Gruyère
- Creamy queso macaroni and cheese
- Sous vide mashed potatoes
- Semi-homemade turkey gravy
- Homemade dinner rolls
- Chocolate bourbon pecan pie
The first job is making refrigerator space. Early prep only helps if you have somewhere to store it. Set out your baking dishes, prep containers, cooling racks, sheet pans, tape, and a marker before you get started.
I like inexpensive restaurant-style containers in different sizes, especially ones that share lids. Label what is inside, and date anything that needs it. That habit is useful for Thanksgiving, and it is even more useful when you are staring at a vacuum-sealed package in the freezer wondering which year it came from.
Disposable roasting pans are handy for more than roasting. They catch leaks while a turkey thaws, hold prepped ingredients, and fit neatly in many refrigerators. Keep raw turkey and its juices separate from ready-to-eat food, and cover stored ingredients.
The day-before checklist
- Bake the biscuits and cornbread for dressing, then crumble them to dry.
- Salt the thawed turkey and refrigerate it uncovered in a rimmed pan.
- Drain the green beans thoroughly.
- Bake and cool the chocolate bourbon pecan pie, then refrigerate it.
- Cook, chill, drain, and refrigerate the macaroni.
- Cook the sausage, celery, and onion mixture for dressing.
- Grate the cheese and finish the vegetable prep.
- Dice, rinse, dry, and vacuum-seal the potatoes with butter and salt.
- Make and shape the dinner rolls if using the overnight approach.
Make-ahead does not mean leave it sitting out. Cool cooked components promptly in shallow containers and refrigerate perishable food within two hours. Keep the refrigerator at 40°F or below. The FoodSafety.gov cold storage guide is a useful reference when planning ahead.
Day Before: Bake the Dressing Bread First
Get the oven working while you tackle the rest of the prep. I started with cornbread in a cast-iron skillet and homemade buttermilk biscuits. Both are headed for the dressing, so this is not a biscuit beauty contest.
Cornbread: a shortcut is perfectly fine
I used Jiffy mix, following the package method with buttermilk in place of the milk because I already had buttermilk for the biscuits.
Preheat the oven to 400°F and heat the cast-iron skillet with a generous spoonful of bacon grease. Add the batter to the hot skillet and bake until done. That hot fat helps build the crust, and the flavor belongs right at home in a pan of dressing.
Biscuits: keep the butter cold and the mixing light
For the biscuits, I used flour, salt, baking powder, grated frozen butter, and ice-cold buttermilk. The big thing is not to overwork the dough.
- Combine the dry ingredients and work in the grated frozen butter.
- Add cold buttermilk and mix just until the dough starts coming together.
- Turn it onto a lightly floured counter.
- Pat and fold it about six or seven times, using a light dusting of flour as needed.
- Cut into portions and bake using your biscuit recipe.
Those visible pieces of butter matter. As the biscuits bake, steam helps separate and lift the layers. You want the dough together, not worked into submission.
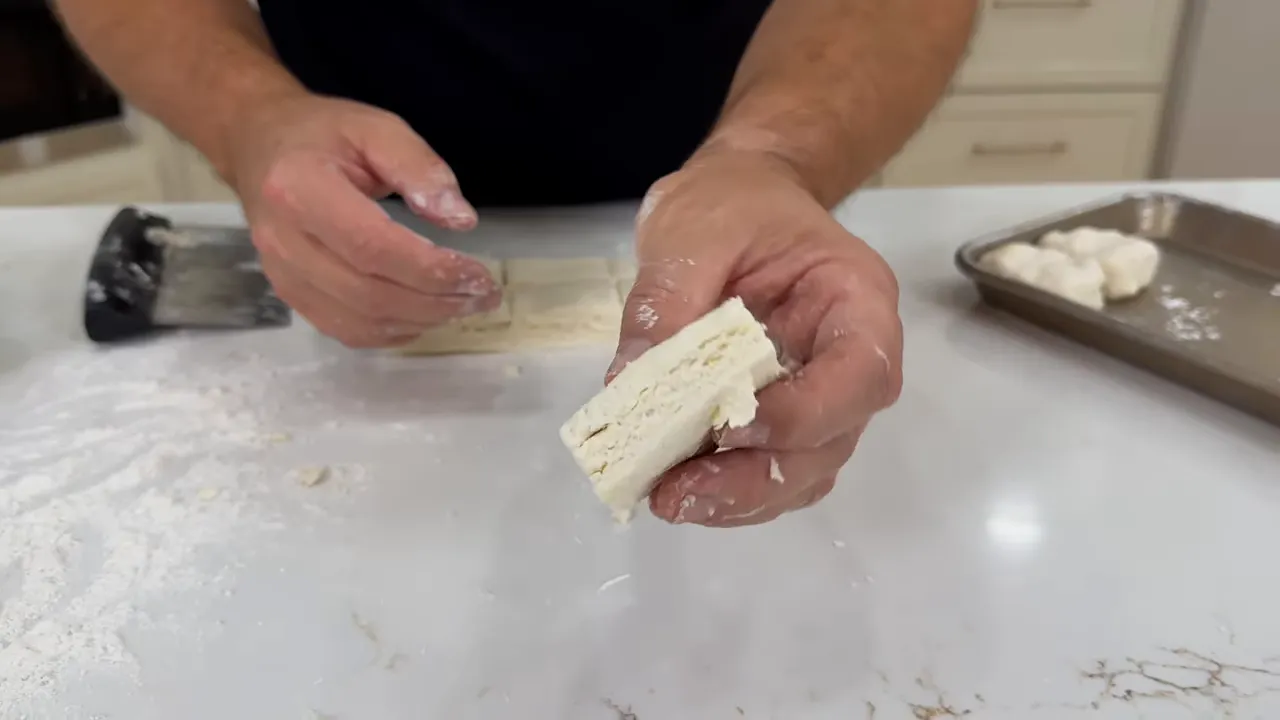
Once the biscuits and cornbread have cooled, crumble them onto a sheet pan. I like some chunky pieces rather than fine crumbs. Spread them out so they can dry, and turn them occasionally. The dressing needs bread that can absorb the liquid you add tomorrow.
Dry-Brine the Turkey Overnight
We have tried plenty of turkey methods, and our family generally prefers a wet brine. But a wet brine takes refrigerator space, a suitable container, and a little more planning. When I am not wet-brining, a simple overnight salt treatment is my go-to.
For this meal, I used a thawed turkey weighing about 14½ pounds. The wing tips were tucked, and I kept the seasoning simple: salt today, herb butter tomorrow.
Check the package before adding salt. This turkey already contained a salt solution, so I used a light hand. An enhanced or pre-brined bird does not need the same treatment as an unsalted one.
I used Diamond Crystal kosher salt, not iodized table salt. Those are not interchangeable by volume. A spoonful of a denser salt can make the finished bird much saltier than intended.
Set the turkey in a rimmed pan and refrigerate uncovered overnight, positioned so raw juices cannot drip onto other foods. That uncovered rest helps dry the skin. I save the herbs and butter for the outside the next day rather than putting butter underneath the skin.
Drain the Green Beans More Than You Think You Need To
Our green bean casserole uses French-cut green beans, country ham, mushrooms, and a Gruyère cream sauce. It is a step up from the usual version, but even a good sauce cannot compensate for a bunch of extra bean liquid.
Drain the beans in a colander, then give them more time to release moisture. Toss or stir them gently and check what collects underneath. We still had a noticeable amount of liquid after the first draining.
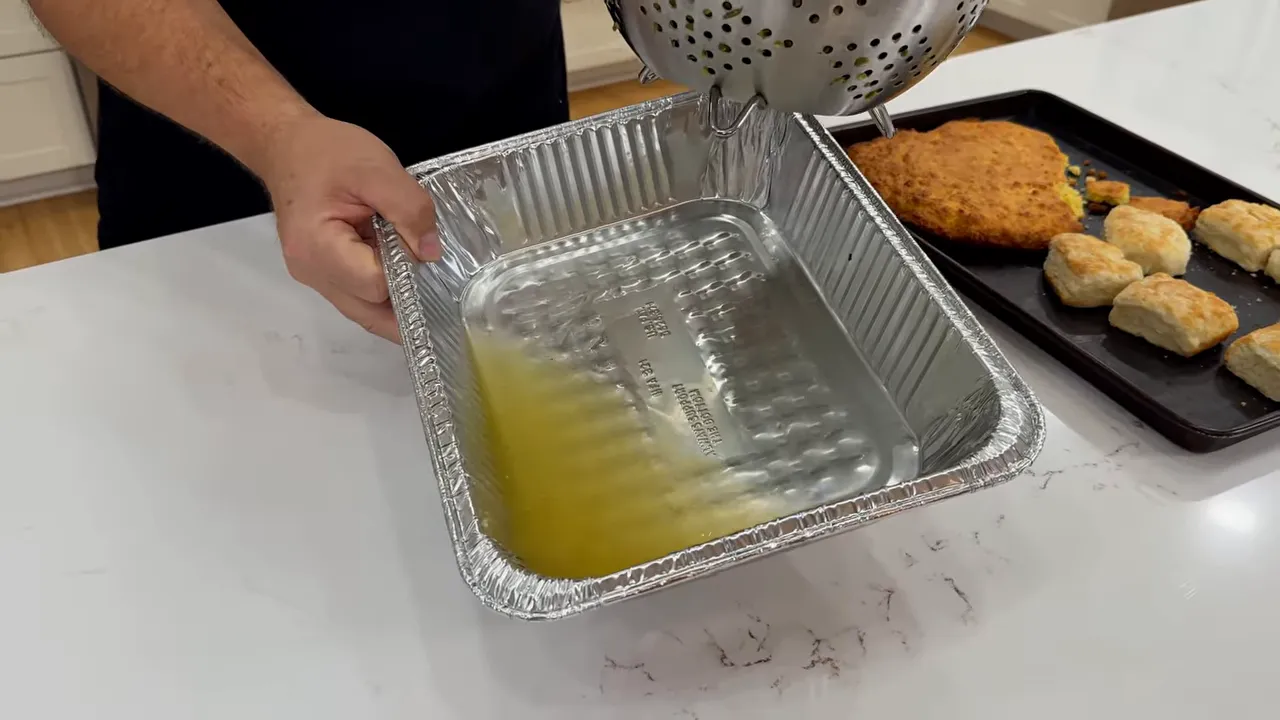
Transfer the well-drained beans to their pan, cover, and refrigerate overnight. Watery green bean casserole is not the holiday tradition we are trying to preserve.
Get the Chocolate Bourbon Pecan Pie Done Early
Dessert is an easy place to get ahead. My aunt has brought pecan pie to family gatherings for as long as I can remember, so it would not feel much like Thanksgiving without one.
This version adds chocolate and a little bourbon. It is rich, with the chocolate coming through and the bourbon staying more in the background.
The filling comes together in this order:
- Beat the butter and sugar together until thoroughly combined.
- Mix in dark corn syrup.
- Add four eggs, incorporating them one at a time.
- Mix in vanilla, bourbon, and a little salt.
- Fold in chocolate chips and pecans, reserving some for the top.
- Pour into a deep-dish pie shell and scatter the reserved pieces over it.
I used a frozen deep-dish crust. If making your own crust brings you joy, go for it. If it adds another hour of stress, there is your answer.
Bake at 350°F until the filling is set. Ours took about an hour, though yours may need longer. Cool on a rack so air can circulate underneath, then refrigerate for overnight storage.
Cook the Macaroni and the Dressing Base Ahead
Macaroni: eliminate a pot from tomorrow's workload
Cooking the macaroni early saves more than cooking time. It also saves a burner, a big pot, a colander, and cleanup on the busiest day.
Cook the pasta for your macaroni and cheese recipe, then transfer it to a cold-water bath to stop the cooking. Drain it very well. Toss with just a touch of avocado oil or another neutral oil, cover, and refrigerate.
Tomorrow, all you have to do is make the cheese sauce, combine, and heat through.
Dressing base: cook the vegetables, do not just chop them
I used to chop all my dressing vegetables ahead and sauté them on Thanksgiving. Then I realized that still left another skillet job for the holiday.
Now I cook the base completely the day before:
- Brown the sausage.
- Add butter, chopped onion, and celery.
- Include some celery leaves if you have them. I love their flavor in dressing.
- Cook until the vegetables have softened.
- Cool promptly, transfer to shallow storage containers, and refrigerate.
The next day, that mixture only needs to be reheated with stock and the remaining ingredients.
Why I prep components instead of finished, dense casseroles
For big batches, I do not like fully cooking mashed potatoes, dressing, or macaroni and cheese, refrigerating a deep pan overnight, and then trying to reheat the whole thing.
The outside can dry out or overcook while the center is still cold. It also ties up the oven when you need it most. Small quantities are easier to manage, but for a family spread, prepping the components and finishing fresh is my preference.
Make the Dinner Roll Dough and Prep the Potatoes
The overnight dinner roll experiment
Baking is one of my favorite parts of cooking. I worked in the bake shop as a Navy cook, where dinner rolls were serious business. We sometimes made about 6,000 a day. At that scale, nobody is volunteering to shape fancy cloverleaf rolls.
For these rolls, start by combining whole milk, yeast, and a little honey. Give the yeast about 10 minutes to bloom and show activity. Then work in the remaining honey, flour, salt, and softened butter according to your dough recipe.
Mix on low until the flour incorporates, scrape down the bowl, then knead at a moderate speed. Shape the dough into a ball, lightly grease it, cover, and let it rise for about an hour.
Gently deflate the risen dough and divide it into roughly 12 equal portions. Our batch weighed 1 pound 11 ounces, which works out to about 2¼ ounces per roll. A scale helps, but reasonably uniform pieces are what matter.
Cup your hand into a C shape, keep your fingertips near the counter, and roll each portion into a smooth ball. Place in a buttered baking dish.
For our experiment, we covered the shaped rolls and refrigerated them overnight instead of giving them their final proof immediately.
If you prefer cloverleaf rolls, divide each roll portion into thirds, shape three little balls, and place them together in a greased muffin cup. Fun for a small batch. Six thousand? Absolutely not.
Vacuum-sealed potatoes: prep without a pot of water
Sous vide mashed potatoes free up stove space, and the potatoes cook in their bag with the butter rather than sitting directly in boiling water.
- Dice the potatoes into reasonably even pieces.
- Rinse and dry thoroughly.
- Add to a food-safe sous vide bag with butter and a little salt.
- Spread into a fairly flat layer instead of a thick mound.
- Vacuum-seal and refrigerate overnight.
I used about a quarter stick of butter per potato for this batch. You can add herbs or thinly sliced garlic, but garlic can come through strongly. This time I kept it simple.
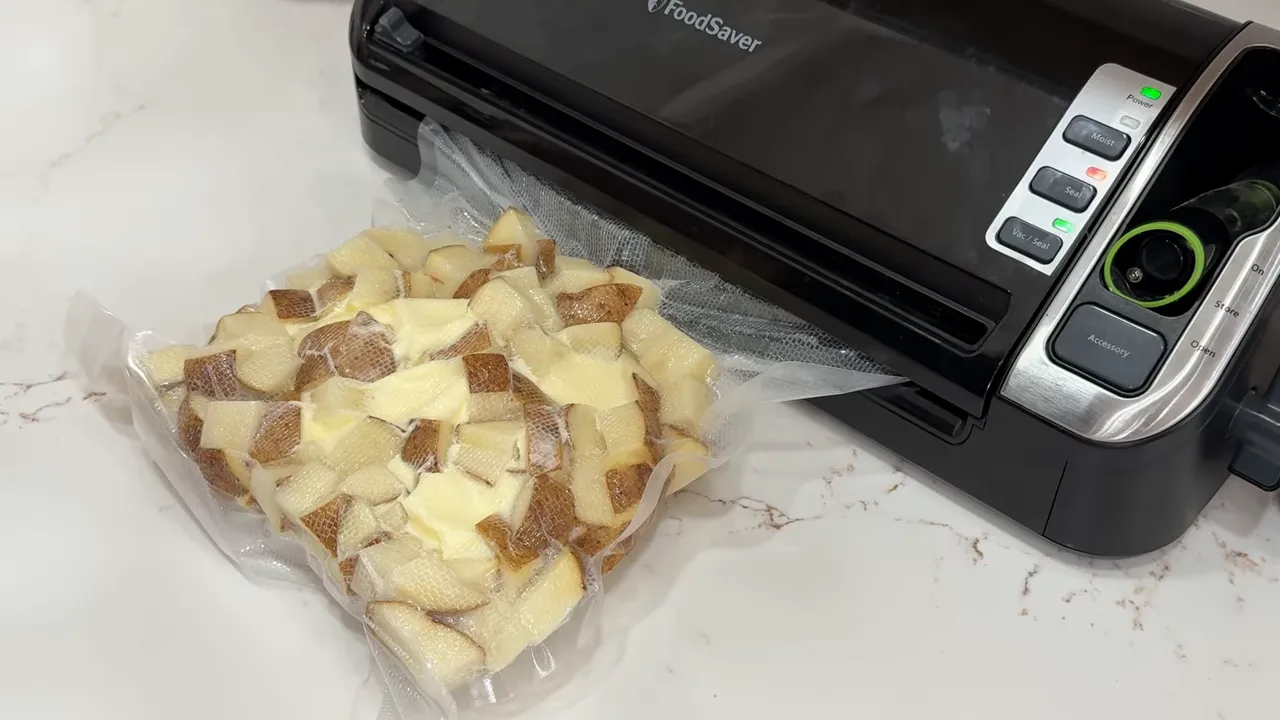
The potatoes stayed their normal color overnight. That was the result we tested. Vacuum sealing is not a substitute for refrigeration, and one overnight test is not a reason to assume an unlimited make-ahead window.
Thanksgiving Morning: Start With the Herb Butter Turkey
I wanted a fairly traditional turkey for this meal because the drippings were going into gravy. We had also made a maple beer-brined turkey that my wife absolutely loved, but those sweeter flavors would change the gravy. Keep the final meal in mind when choosing your turkey seasoning.
Build a vegetable bed for the drippings
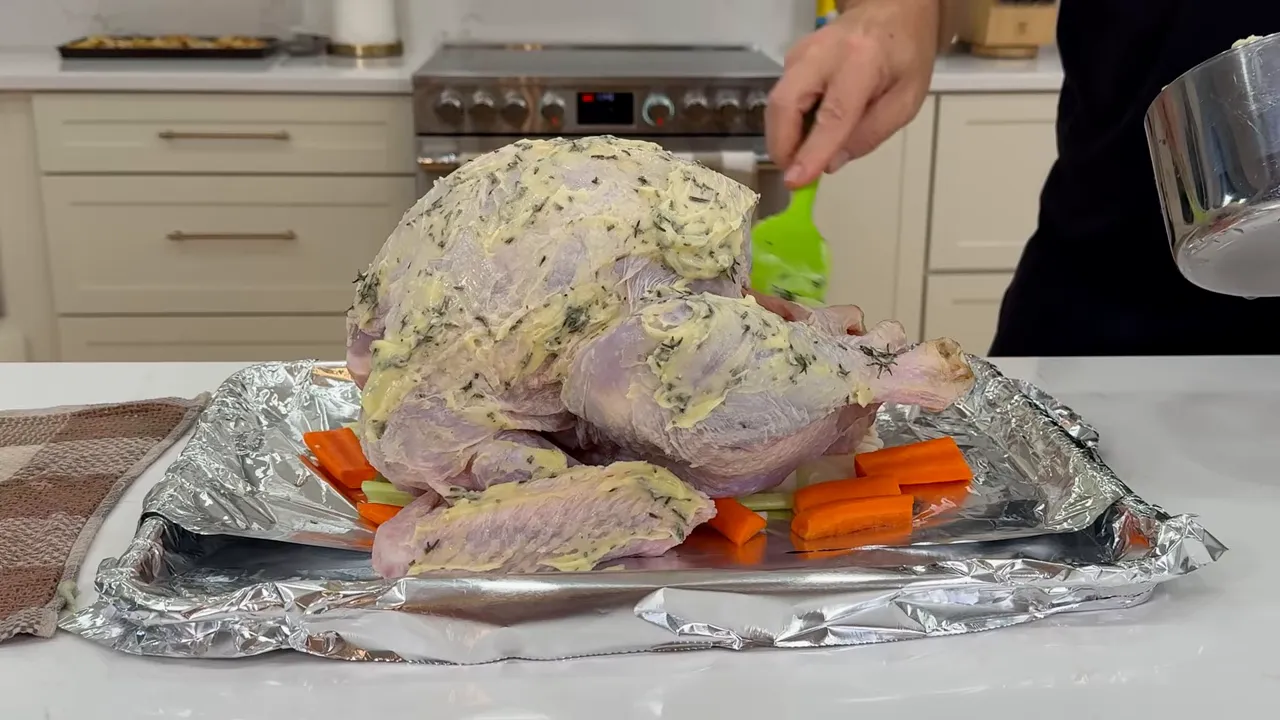
Arrange onion, carrot, and celery in the roasting pan as a little raft beneath the turkey. It raises the bird slightly and gives the drippings a flavorful foundation.
I leave the cavity empty. That is my preference, and I would rather put the aromatics beneath the bird where they help the gravy.
Melt the herb butter, then let it thicken
Gently melt a stick of butter with fresh thyme, rosemary, and a clove of garlic. I lean more heavily on thyme because rosemary can take over. A little lemon zest would also fit here without changing the whole direction of the gravy.
Take the butter off the heat and stir as it cools. You want it soft and spreadable, not so thin that it immediately runs off the turkey.
Coat the outside thoroughly, getting into the nooks and crannies, and finish with coarse black pepper. The cold bird will help firm the butter as you spread it.
Use temperature checkpoints, not a promised cooking time
We started the turkey at 325°F, with a probe in the breast. At 130°F internal temperature, I rotated the pan and raised the oven to 375°F to finish cooking and encourage more skin browning.
That 130°F reading is only an oven-adjustment checkpoint, not a serving temperature. For a straightforward home-cooking safety standard, follow the USDA turkey guidance: verify 165°F in the thickest breast and the innermost thigh and wing, avoiding bone.
I removed this particular bird at a breast reading of about 153°F while monitoring carryover cooking. That is not a universal pull temperature or a complete safety instruction by itself. Do not assume every turkey will rise enough during its rest.
Leave the probe in while the bird rests so you can follow the temperature rise, plateau, and eventual decline. Check more than one location before serving.
Our turkey cooked unusually quickly, roughly an hour and a half in our setup. We were using a convection oven, and oven performance, bird size, and starting temperature all affect timing. Build flexibility into the schedule and trust verified temperatures, not our elapsed time.
While the Turkey Roasts: Potatoes, Dressing, and Roll Proofing
Get the sous vide potatoes cooking
Cook the sealed potatoes in a water bath at about 197°F for 1½ to 2 hours, until tender. Timing depends on the size of the pieces and how thickly they are packed.
Set the equipment on a stable, heat-protected surface and keep the electrical connections away from water. The whole point is to free a burner without creating another problem.
If the potatoes finish early, I lower the bath to about 150°F and hold them there until I am ready to mash.
Finish the sausage and herb dressing
Reheat yesterday's sausage, onion, celery, and butter mixture with chicken or turkey stock and cream of chicken soup. That soup is one of my little helpers for keeping the dressing moist.
For this batch, I added about two teaspoons of sage, half a teaspoon of thyme, and a teaspoon each of salt and black pepper. Those are starting points for this batch, not a universal seasoning ratio. Your bread, sausage, soup, and stock all affect the final seasoning.
My grandmother always used eggs in her dressing. I added one in her honor, mixing it through the bread before stirring in the hot liquid. Give the bread time to absorb that liquid instead of deciding immediately that the mixture is too wet.
Transfer to a lightly greased baking dish. I leave the top rough, with little peaks and edges that can brown. Since this version contains egg, verify that the finished dressing reaches 165°F in the center.
Give the refrigerated rolls enough proofing time
Bring the covered rolls out early enough to warm and complete their final proof. We allowed about two hours, but the kitchen temperature matters. Our house stays around 65°F, which slows things down. A suitable proof setting around 80°F is helpful if your oven has one available.
Do not use the clock as the only test. The dough needs to look properly risen. Our rolls looked less puffy than my usual same-day batch, which made me question the method, but they baked up soft and chewy in the end.
The overnight method worked for us, but allow extra proofing flexibility. If you want the most familiar results with this dough, making the rolls the day of is still a good option.
Make the Queso Mac and Cheese Sauce
This is the shortcut that surprises people: prepared queso takes the place of the usual roux-based foundation. We had already used the method when cooking for about 100 people, and the response was excellent.
Choose a queso you actually like. Its flavor is going to be part of the finished dish.
Warm the sauce base gently, melt in cream cheese, then add white American cheese. Stir from the bottom upward so nothing sits against the pan and scorches. You can work in cheddar, Gruyère, or Gouda if that is the direction you want to go.
Finish with black pepper or white pepper, and keep the sauce looser than you think the finished macaroni should be. It thickens as it cools and firms up further when it meets the pasta.
Combine with the chilled macaroni, reserving a little sauce for the top. I want sauce inside those elbows, not just pasted around the outside. Transfer to the baking dish and heat thoroughly. Extra shredded cheese between layers or on top is optional.
The finished top can look firmer than the macaroni underneath. Ours was still creamy when we scooped into it.
Build the Country Ham and Gruyère Green Bean Casserole
This is probably my favorite thing on the plate. It takes the familiar mushroom-and-cream idea and builds it with sautéed vegetables, country ham, and Gruyère.
- Brown diced country ham in a hot skillet. Ours rendered enough fat that it did not need extra to start.
- Remove the ham, leaving the fat behind. Add onion, a little butter, and mushrooms.
- Sauté the vegetables. Their moisture helps loosen the flavorful browned bits from the skillet.
- Return the ham. Spoon everything over the well-drained beans.
- Make a blond roux. Cook butter and flour together until the raw flour taste is gone.
- Whisk in chicken stock and heavy cream. Bring to a gentle simmer so the sauce thickens.
- Add Gruyère in batches over gentle heat. Let each addition melt before adding more.
- Pour over the beans and finish with crispy fried onions. Bake using the casserole recipe's timing.
Be careful with salt. Country ham is salty, and the cheese and stock contribute seasoning too. I did not add extra salt to this sauce before combining everything.
And the crispy onions? Use a sensible amount. Then remember why half of us showed up for green bean casserole in the first place.
Use the Turkey's Rest to Finish the Sides
Once the turkey is safely cooked, get it out of the oven and let it rest. Do not slow down its cooking just because another dish is behind. That freed oven space is part of the plan.
Our finishing sequence worked like this:
- The turkey came out to rest.
- The green bean casserole and dressing went into the oven.
- The macaroni was combined with its warm sauce.
- The potatoes were mashed while the casseroles baked.
- As oven space opened, we heated the macaroni and baked the proofed rolls.
- Gravy came together on the stove using the turkey drippings.
Adjust that order to your oven capacity and the baking requirements of your recipes. We spent about three hours cooking on the holiday itself, but that was possible because the chopping, draining, bread baking, pasta cooking, and much of the cleanup had already happened.
Finish and hold the mashed potatoes
Check tenderness by gently pressing a potato piece through the bag. It should break down easily.
Transfer the cooked potatoes and their butter to a bowl. Warm the cream before adding it, then mash or mix only as much as needed. I used roughly ½ to ¾ cup heavy cream for our batch, adjusting for consistency, and finished with coarse black pepper.
Do not overmix. That is a quick way to turn good potatoes gummy.
We set the bowl over the warm sous vide water like a double boiler to keep the potatoes warm. Use a stable, heat-safe bowl and check the holding temperature rather than assuming warm water is enough.
Turn the Turkey Drippings Into Semi-Homemade Gravy
This is why I kept the turkey's flavor fairly traditional. The roasted vegetables, drippings, and browned bits in that pan are the foundation of the gravy.
- Move the rested turkey to a carving board.
- Add a little stock to the roasting pan and scrape up the flavorful bits.
- Strain the liquid away from the vegetables.
- In a saucepan, cook about two tablespoons butter with three tablespoons flour into a blond roux, or slightly darker if you prefer.
- Whisk in the strained drippings and stock, letting the mixture thicken fully.
- Add a jar of prepared turkey gravy.
- Adjust the consistency with stock, cream, or milk.
That jar is my little cheat code. The drippings bring the homemade flavor, and the prepared gravy helps round it out. I like a little cream at the end.
Once you carve the turkey, save the board juices too. Stir them into the gravy before serving.
Carve, Hold Safely, and Get Everybody Fed
For turkey breast, pay attention to the grain. Remove the breast so you can position it on the board, then slice across the grain rather than following those long muscle fibers.
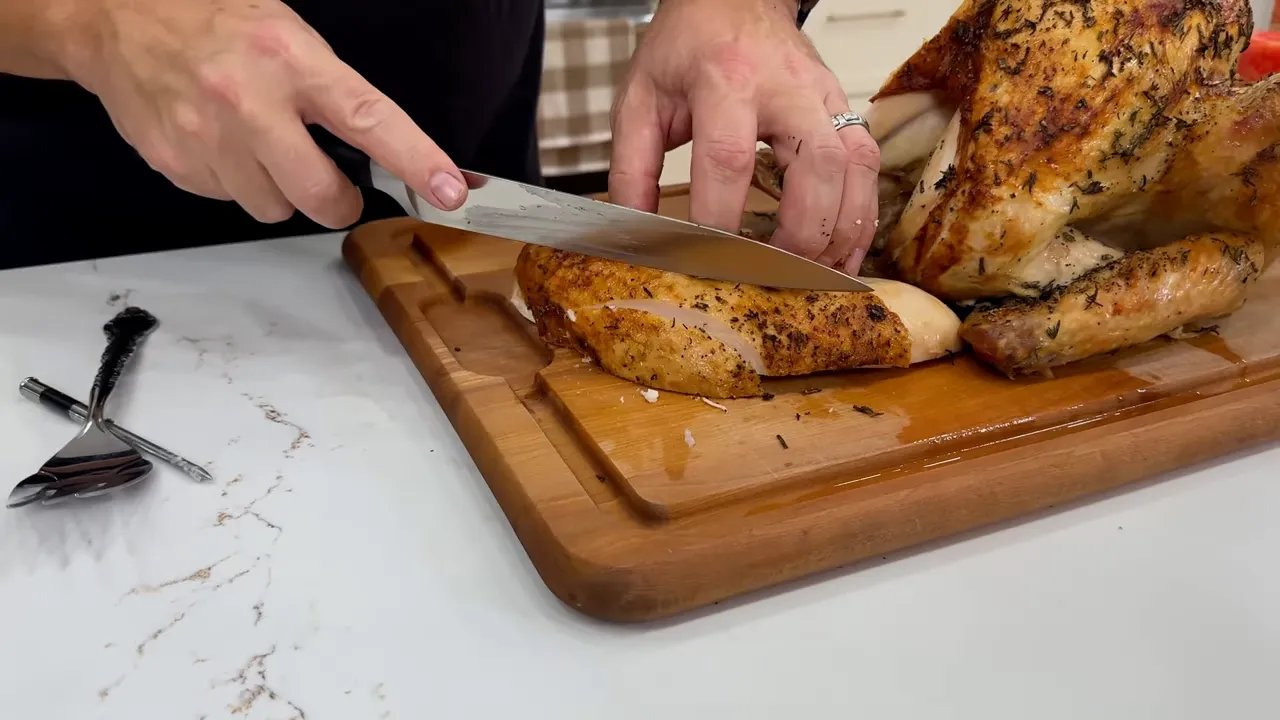
If you are ahead of schedule, put carved turkey into a serving pan with a little warm chicken or turkey stock in the bottom and cover it. The stock helps with moisture, but it does not replace safe holding: keep hot food at 140°F or above, or refrigerate promptly if it will not be served soon.
Keep extra warm stock and butter available. Both come in handy during the final stretch.
Protect your counters, too. We use sheet pans and racks when we need more landing space for hot dishes, but metal alone is not a guaranteed heat barrier. Use proper heat protection underneath, and remember that stacked pans can slide.
Leave room for the family traditions
This menu is only the starting point when our family gets together. There might also be broccoli chicken casserole, baked beans, stuffed celery, deviled eggs, and enough appetizers to count as another meal.
One of our favorite deviled egg variations swaps the pickles for candied jalapeños. And cranberry sauce? I am perfectly happy with the canned kind. My wife does not share that enthusiasm, but I could make a serious dent in a whole can myself.
The finished meal gave us exactly what we wanted: juicy turkey, creamy macaroni, soft rolls, potatoes and gravy, dressing with some texture, and that country ham green bean casserole. The chocolate bourbon pecan pie was rich without tasting overly sweet, with a little bourbon behind the chocolate.
The goal is not to do every possible task ahead. It is to do the right tasks ahead. Drain the beans. Cook the pasta. Sauté the vegetables. Grate the cheese. Then spend Thanksgiving bringing the meal together instead of starting from scratch.
Our free printable Thanksgiving guide gathers the plan and recipes in one place so you can keep them handy while you prep and cook.
The Thermometer I Used for This Meal
I used the Typhur Sync Gold Series to track the turkey. What I appreciate most is the temperature display on the base: I can walk past and check it without reaching for my phone. It also offers app connectivity, internal and ambient temperature readings, and manual or smart modes.
The model featured here has a thinner 4.2 mm probe, washable waterproof probes, and a stated high-heat resistance of up to 1,000°F for the applicable probe components. Follow the manufacturer's limits and insertion instructions rather than treating that number as permission to expose every part of the system to high heat.
For me, the useful part is simple: reliable temperature information takes a lot of guesswork out of a holiday roast.


