The Traeger Flatrock has been one of my favorite griddles for more than three years. So when Traeger brought out the less expensive IronTop, my biggest question was pretty simple: how much of what I like about the Flatrock made it into this cheaper griddle?
After months of cooking, seasoning, cleaning, and testing, I’m pretty dang impressed. The IronTop has a few hot patches, the initial seasoning takes some patience, and it is not built exactly like the Flatrock. But at the $599 price quoted at the time of this review, it makes a strong case for itself.
First, the disclosure: Traeger supplied this griddle for free. This was not a paid review, and Traeger did not know what I was going to say. I had it from October into roughly mid-June, including testing before I started sharing the cooks. I wanted to get a real handle on this bad boy before giving it a verdict.
Quick Summary
- The $599 IronTop offers strong cooking performance at a lower price than the Flatrock.
- Heat distribution is mostly even, with localized hot patches and a warmer front band.
- The cooking surface needs extra initial seasoning but has held up well through months of use.
- Four locking casters, built-in wind guards, and accessible propane placement add everyday convenience.
Table of Contents
- Assembly: Read the Directions Better Than I Did
- Heat Testing: How Even Is the Traeger IronTop?
- Real Cooking: Useful Low Heat and Plenty of Searing Ability
- The Cooking Surface Is the Biggest Selling Point
- Burners, Wind Guards, and Build Details
- Storage, Mobility, and Accessories
- Grease Management and the Protective Lid
- Traeger IronTop vs. Flatrock: What Are You Giving Up?
- Final Verdict: Is the Traeger IronTop Worth It?
Assembly: Read the Directions Better Than I Did
Traeger has a little beer-themed progress guide in the assembly instructions. That’s entertaining, but apparently I needed to spend more time reading the actual directions.
I installed a shelf on the wrong side and managed to put the handle on upside down. When the lettering is facing the wrong way, that’s a pretty good clue you missed something.
The useful takeaway is to check the shelf locations and handle orientation before tightening everything down. My mistakes are not a reliable measure of how long assembly should take. They’re a reliable measure of what happens when I think I’ve read enough.
Heat Testing: How Even Is the Traeger IronTop?
A griddle can have all the accessories in the world, but if the cooking surface doesn’t heat well, none of that matters much to me. I started with a low-temperature check and then used a bread test to see the heating pattern.
After 10 minutes on low
With the burners on low for about 10 minutes, my surface readings were roughly 325°F to 350°F through the middle. The hotter areas were around 350°F, with only a little variation.
That’s the kind of start I like. I want a useful low setting, not a griddle that immediately runs away from me while I’m getting food ready.
What the bread test showed
The bread test is just a visual heat map. Cover the surface with slices of bread, let them develop some color, and flip them to see where the griddle is cooking faster or slower. You don’t need an infrared thermometer to recognize a dark piece of toast.
And yes, I used stale bread that was headed for the trash anyway.
I checked the bread after about six minutes. The point wasn’t to hit an exact cooking time. The point was to get enough color to identify the hot spots.
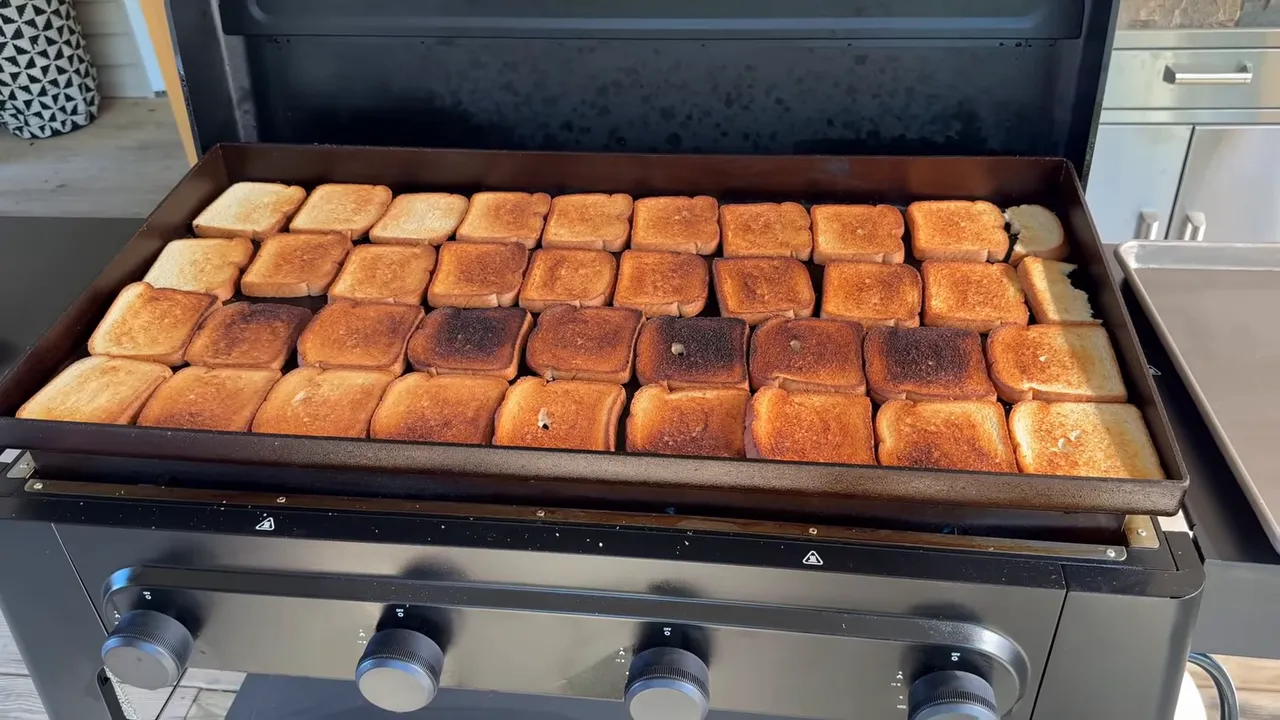
Here’s what stood out:
- The back row browned well. There wasn’t a big, cool strip along the rear edge.
- A few localized patches ran hotter. The darker bread made those easy to spot.
- The overall surface was fairly even. The differences weren’t turning entire sections into dramatically hotter cooking areas.
My rough assessment was about 85% to 90% even, or a B-plus. That’s my practical judgment from the browning pattern, not a laboratory measurement.
I still think the Flatrock is probably the most even griddle I’ve used. But the IronTop belongs high on the list. Depending on how you group them, I’d put it in the top tier or at least high in the second tier for heat consistency.
After about 21 minutes on low
After the bread came off, the griddle had been running on low for approximately 21 minutes total. Readings through the middle were then around 400°F to 440°F. The hotter readings lined up with the darker areas from the bread test.
That is getting hot for a low setting, and it deserves mentioning. The IronTop does continue climbing if you leave it heating.
At the same time, a long preheat with no cooking underway isn’t the whole picture. Adding food pulls heat out of the surface. There’s a difference between stepping inside briefly to grab ingredients and leaving an empty griddle heating for 20 minutes.
Overall, I put its low-setting performance in roughly that B-plus to A-minus range. I liked what I found, but I would not treat “low” as a fixed surface temperature.
Real Cooking: Useful Low Heat and Plenty of Searing Ability
Across months of use, we cooked breakfast, eggs, bacon, and foods that needed good browning and a solid sear. The IronTop gave me a useful low end and a strong high end.
Every griddle has a heating pattern. Learning that pattern is part of getting comfortable cooking on it, and this one is no different.
On the IronTop, I noticed several small hot patches, plus a somewhat hotter band toward the front, roughly in line with the grease opening. At low heat, the differences weren’t especially noticeable during cooking. At higher heat, I could make more use of that warmer area.
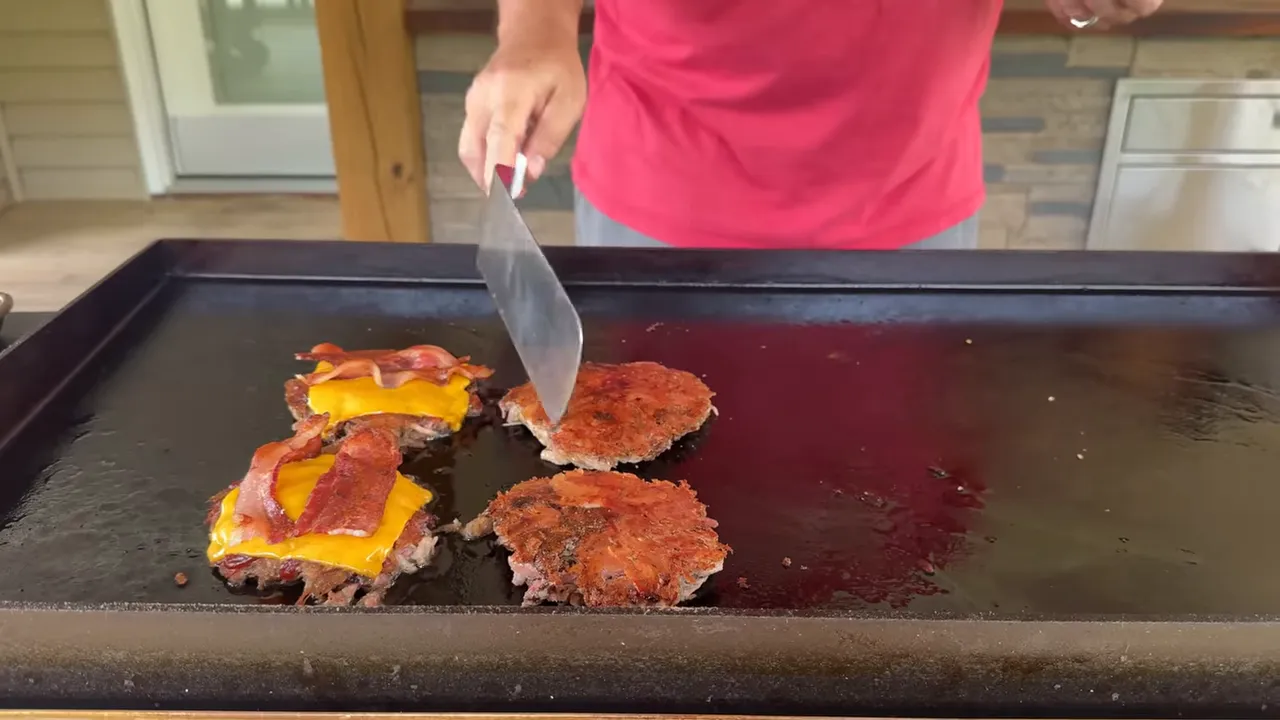
What I like is that the extra heat stays fairly localized. I’m not finding that one hot patch turns into an entire overheated strip running across the cooking surface.
You can call that hotter front area a plus or a minus. I’m getting used to it, and it gives me a little searing spot where I can move food for extra color. More importantly, the rest of the griddle stays reasonably consistent, including toward the edges.
The Cooking Surface Is the Biggest Selling Point
The surface is what really gets my attention with Traeger griddles. I loved it on the Flatrock, and Traeger told me it followed the same approach to the surface, design, and craftsmanship on the IronTop.
I don’t know the secret behind the finish, and I’m not going to pretend I do. What I can talk about is how it has behaved in my cooking.
My Flatrock has gone more than three years without the seasoning, flaking, and rust headaches that people often worry about. The IronTop has given me a similarly encouraging experience over the months I’ve used it. I haven’t had surface problems or warping during my testing.
That doesn’t make the IronTop rustproof, and it doesn’t give it a three-year track record yet. Those are two different griddles with different lengths of time behind them. But the early results are a big reason I like this one.
It needs more initial seasoning than you might expect
The IronTop arrives with a rust-resistant treatment, but you still need to season it. My initial preparation was to wash it with soap and water, clean it thoroughly, dry it, heat it, and then begin seasoning.
I’m not going to sugarcoat this part: it’s a bear to season initially compared with some other griddles. The surface feels rough when it’s new, and mine needed a couple more coats than I would typically expect.
You don’t need to reinvent your seasoning method. You need some patience and a few additional layers. For model-specific care instructions, the Traeger support site is a useful reference alongside the instructions supplied with the griddle.
My theory about the rough texture
My personal theory is that the surface has deeper microscopic peaks and valleys than some competing griddles. I suspect that is why it takes more seasoning to develop a smoother cooking finish, and perhaps why the seasoning seems to hold up so well afterward.
That is a theory, not a confirmed explanation of Traeger’s manufacturing process. I haven’t measured the surface texture or proven how it affects the seasoning bond.
What I do know is that once mine was seasoned and cooking well, keeping it ready to use felt easy.
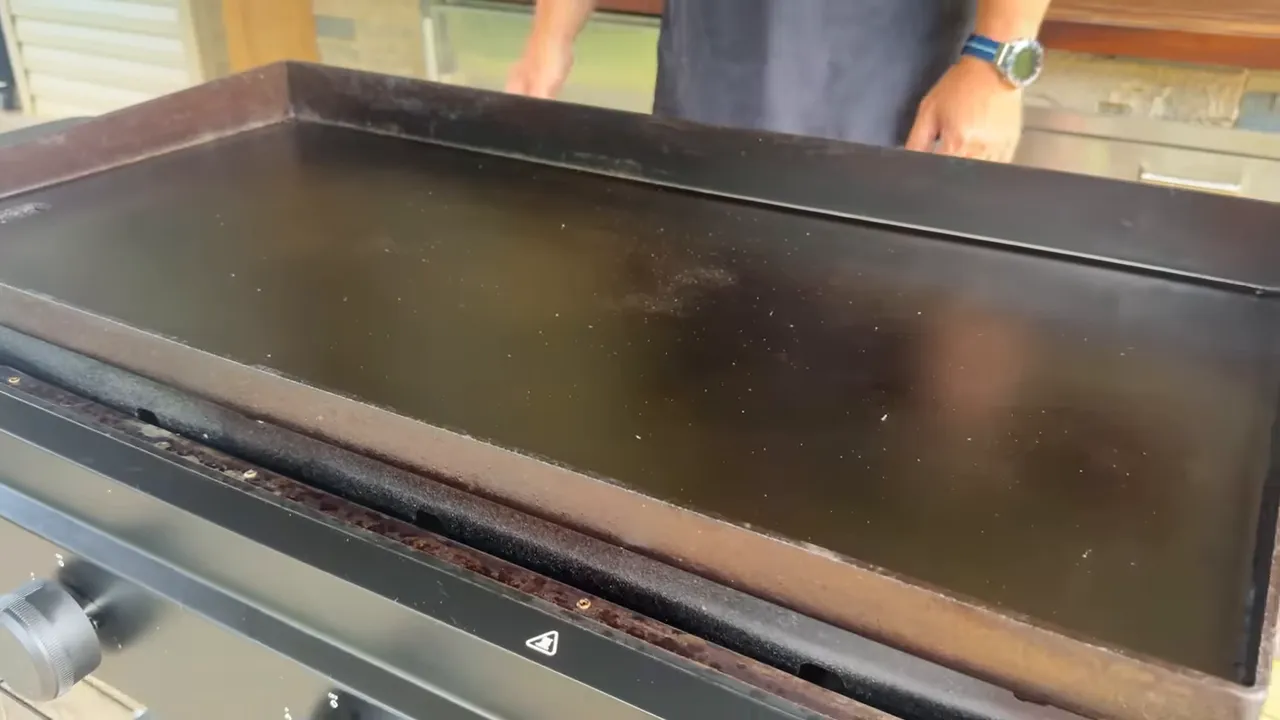
I didn’t give the top a special cleanup just to make it look brand new for the review. I had cooked on it that week and wanted to show its normal condition. That practical, ready-for-the-next-cook finish is good enough for me.
Burners, Wind Guards, and Build Details
The IronTop has four independently controlled burners. Each one needs to be ignited and shut off individually.
Removing the cooking plate gives you a straightforward look at the burner layout. There isn’t anything particularly fancy going on underneath, and the plate itself is heavy.
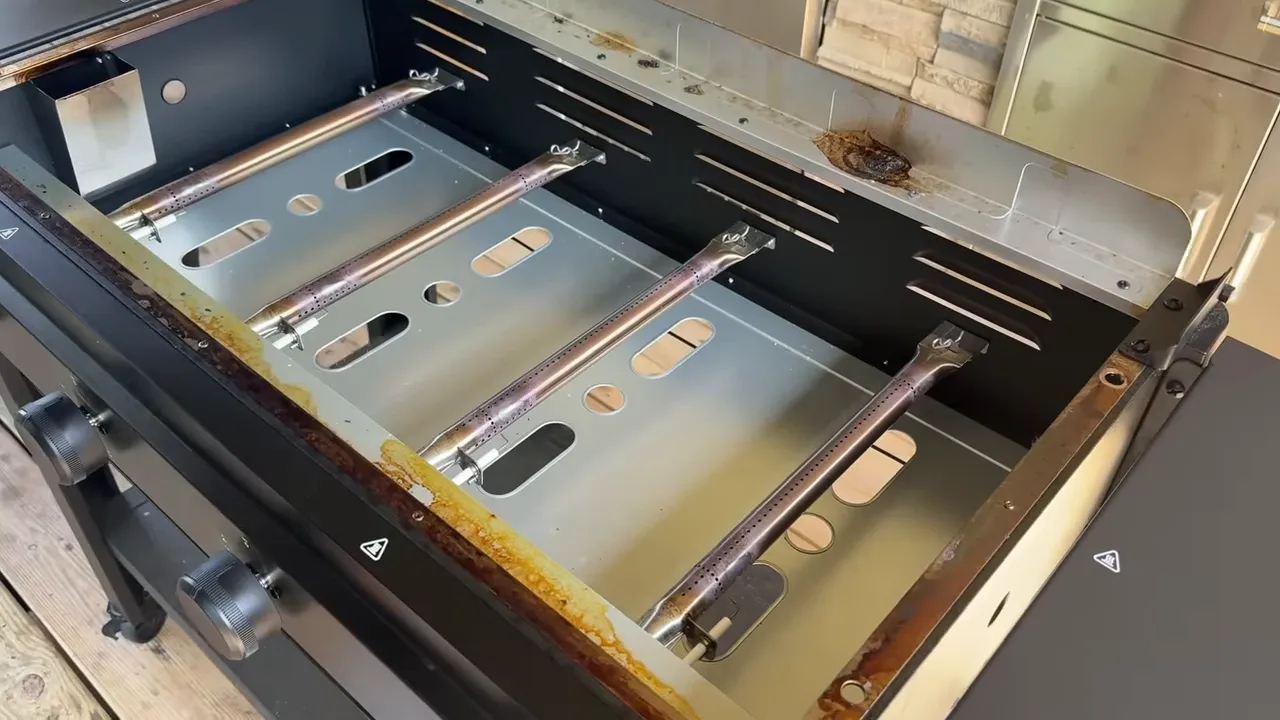
The underside of the cooking plate does not have the cross bracing some people look for to help resist warping. That’s worth knowing, but I have not had a warping issue with this one.
The IronTop also has built-in wind guards. Small openings at the front let you check for a flame, while the sides have shielding around the burner area.
The arrangement differs from the Flatrock. Rather than using the same recessed cooking-plate setup, the IronTop’s plate sits higher with guards beneath it. Different design, but I’m glad the wind protection is built in.
Storage, Mobility, and Accessories
Starting from the bottom, there are several useful everyday features here.
- Four locking caster wheels: I like being able to roll the griddle around easily, and all four wheels lock.
- A lower storage shelf: It’s lightweight, but useful for a small storage setup or supplies. This is not where I’d put a 150-pound anvil.
- Accessible propane placement: The tank sits off to the side, and I find it easier to reach than the tank on my Flatrock.
- Two side shelves: The shelf over the propane tank stays up. The opposite shelf folds down to save storage space.
- Six utility hooks: Three on each side give you places to hang tools, and they haven’t gotten in my way.
Both sides also accept Traeger’s P.A.L. Pop-And-Lock accessories. That accessory system includes options such as paper towel holders, utensil holders, and storage containers that attach to the shelf rails.
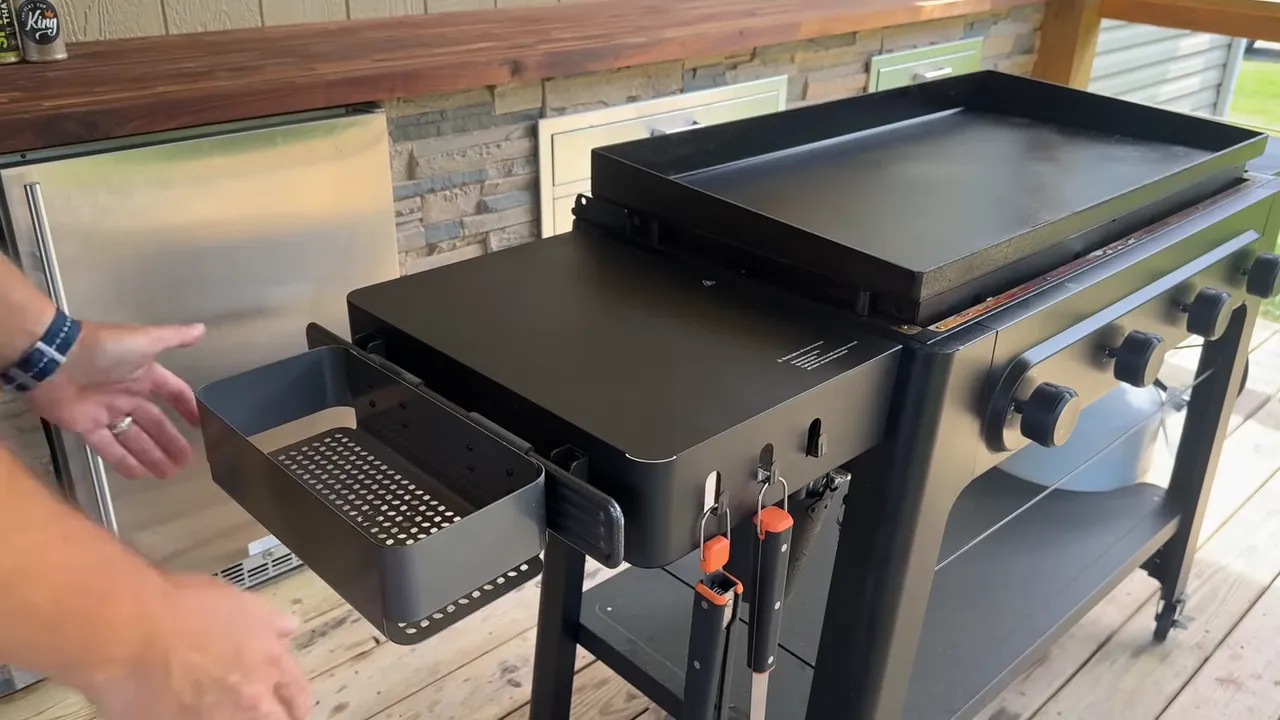
Those are practical conveniences rather than the reason I’d buy a griddle. Still, having somewhere to put things makes cooking a little easier.
Grease Management and the Protective Lid
The grease system uses an opening near the left side of the cooking surface. Grease travels down a chute into a hanging bucket below the side shelf.
One detail matters if you’re comparing the bucket size: the bucket I used during the review was larger than the one supplied with the IronTop. I swap buckets between equipment, and this one also fits my Traeger pellet grill. I like keeping one size around.
The IronTop also comes with a hinged metal lid. I removed mine once we started regularly filming cooks, which is why it isn’t always shown attached.
The lid is for protection, not for closed-lid cooking while the griddle is heating or in use. One design choice I do like is how far it stands back when open. It hangs farther behind the griddle than some lids, leaving the cooking area feeling more open instead of crowding the rear of the surface.
Traeger IronTop vs. Flatrock: What Are You Giving Up?
The Flatrock is still my benchmark for even heating. I also think its overall build is different, so I wouldn’t call these identical griddles with different prices.
But the IronTop has a few things going for it:
- A lower price: The quoted regular price was $599 before any retailer promotions.
- Four burners rather than the three on my Flatrock: You get another independently controlled burner.
- The surface qualities I like about Traeger: It takes effort up front, but mine has been easy to live with once seasoned.
- Strong edge-to-edge performance: There are hot patches, but not the broad temperature problems that would make me dislike cooking on it.
More burners alone don’t settle the comparison. The way a griddle distributes heat matters more than simply counting knobs. That’s why the bread test and months of actual cooking carry more weight for me than a feature list.
Final Verdict: Is the Traeger IronTop Worth It?
At $599, I think the Traeger IronTop is a very good griddle for what you get. It earns a place in the conversation for somebody buying a first full-size backyard griddle or looking for a less expensive way into Traeger’s lineup.
The drawbacks are real: initial seasoning takes extra work, a few areas run hotter, low heat keeps climbing during a long empty preheat, and only one side shelf folds down. If you want the most even Traeger cooking experience I’ve personally used, I still give the Flatrock the edge.
But the IronTop keeps the part I care about most: a cooking surface I really enjoy using, backed by good overall heat distribution and useful everyday features. If you find a retailer deal below that quoted price, the value only gets more interesting.
I went into this with high hopes because of the Flatrock. After months of use, the cheaper Traeger has done a pretty good job of living up to them.


